Friday, April 22, 2011

Ranked Dimms?


So, today I was specing out a couple SQL servers, and I have not had to do any hardware specing in a few years, so things sure have changed when looking into the hardware components. One of the things that I was seeing on HPs site was Ranked Dimms. I found this website that explained what Ranked Dimms are, good read!

http://www.oempcworld.com/support/Whatis_4-Rank_DIMM_Memory.htm

Wednesday, February 9, 2011

Remote uninstall of SEP 11


http://www.symantec.com/business/support/index?page=content&id=TECH105827&locale=en_USWhile Logged into an account that has domain admin rights, you can run this command after downloading psexec.exe from Microsoft.

psexec @c:\computers.txt MsiExec.exe /norestart /q/x{2EFCC193-D915-4CCB-9201-31773A27BC06} REMOVE=ALL

Where @c:\computers.txt is a txt file that I pulled from the AD computers OU and chopped it up in excel so that it lists all the computers, one line at a time.

Example:

XPPC001
XPPC002
XPPC003

{2EFCC193-D915-4CCB-9201-31773A27BC06} is the uninstall string from the local systems registry. This can be found by going to

HKEY_LOCAL_MACHINE\SOFTWARE\Microsoft\Windows\CurrentVersion\Uninstall

http://www.symantec.com/business/support/index?page=content&id=TECH105827&locale=en_US

If there is a password set on the clients you can:

A) disable it from the SEP Manager

B) Edit the registry to zero out the password Value.

I will post how to do this soon.

Tuesday, January 25, 2011

Ever want to double check who has what FSMO roles quick?


I always seem to forget the stupid command to type to look at show what servers hold what FSMO roles. This can be nice when walking into a network that is having issues and there are multiple domain controllers. Knowing what domain controllers do what can help in your troubleshooting.

Open up a command prompt with enterprise admin privileges and run the following command.

Netdom query fsmo

You should see something to the effect of..

image

Thursday, December 30, 2010

Windows Deployment Services: Capture an Image

Booting to the Capture Image

First boot to the network by pressing f12 and selecting the network adaptor.

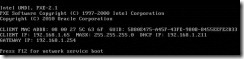
Once you have done that you should see a PXE boot screen similar to the following.
clip_image002

Make sure you press F12 again once tells you to Press “F12 for network Service Boot”

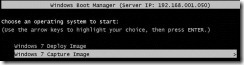
The next screen will list the available boot images to you. Since we are going to be Capturing a Windows 7 image, select “Windows 7 Capture Image” using your arrow keys on the keyboard and press “Enter”
clip_image004

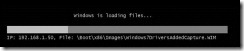
Windows will then load the WIM file into RAM on the client machine. You can see the name of the WIM file that is being loaded, this is always good to look at to make sure it is the correct one.
clip_image006

Once it is loaded into RAM you will see the “Windows Deployment Services Image Capture Wizard” come up.

clip_image007

Click “Next” to continue

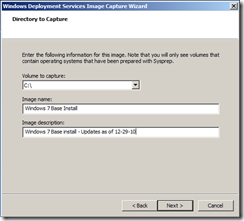
On the Volume Capture dropdown box, select the drive letter to capture. Normally this will be C:\ and name the image as well as giving the image a description.
clip_image008

Press Next.

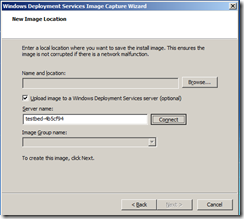
The next screen will give you an option on where to store your image. You can store it to a removable hard drive, shared network folder, or even directly upload it to the WDS server.

**NOTE**
If you do not see anything in the “volume to capture:” drop down box, something went wrong with your sysprep or the WIM capture image does not have the correct hard disk drivers installed.
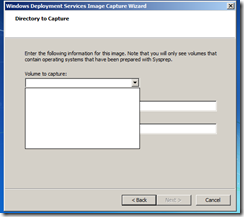
clip_image009

Refer to “Syspreping your Client” and “Injecting Drivers into a WIM file” to correct these issues.
 

clip_image010

I chose to upload to the WDS, I typed the name of my machine in and hit connect. You will then be prompted for a username and password after it times out trying to connect anonymously.

Type in a Domain Administrator’s user account and password; make sure to add the domain name in front of the username.

clip_image011

Once you are authenticated, the “Image Group Name:” drop down becomes available. This will allow you to put the image in a particular image group on the server.
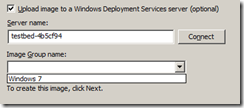
clip_image012

Click Next.

If next does not show up you can also just add the image manually, to do this, click “Back” then “Next” and it will bring you back to the screen where you can choose a location for the image to be stored.
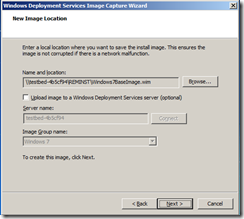
clip_image013

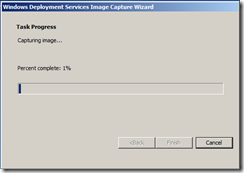
Press Next to begin upload to the server.
clip_image014

Depending on the size of the image and the speed of the network, this can take anywhere from 10 minutes to a few hours.

clip_image015

Client Side Setup: Sysprep Client Machine

Once you have finished installing all updates/software and configuring any settings you want to have on each image, you will need to strip out all of the unique information from that install so that you can image multiple machines with the same image and not have issues with duplicate names and System IDs on the network. To do this we will use a tool included in Windows 7 called Sysprep.

Sysprep is located by default at:

C:\windows\system32\sysprep\sysprep.exe

There are many options that go along with sysprep, this will be discussed in a later guide. For deployment purposes, all we need to know now is how to get our windows 7 machine ready to image.

To do this go to “Start –> All Programs –> Accessories” Right click on “Command Prompt” and choose “Run as administrator”

clip_image001

If you have User Account Control enabled, click YES to the dialog box that pops up.

The following options are available to us for Sysprep

clip_image002

For this example we are just going to use the following:

“Sysprep.exe /generalize /oobe /shutdown”

clip_image004

This will strip information from the machine and shut down the computer. Once the machine is turned back on you will get the “Out of Box Experience” as if the machine had just had Windows 7 Installed.

To run this command we just type it in the command prompt and hit enter. It will bring a window up and shut down when it is finished.

clip_image005

**Note**
Do no turn the machine back on until you are ready to capture an image. If you do you will have to re-sysprep the machine, this can only be done 3 times!!

Wednesday, December 29, 2010

Plug-ins for Windows Live Writer


I just installed a bunch of neat plugins for Live Writer. This is just a post to test them.


Windows Deployment Services

Currently I am working on getting an all inclusive guide for Windows Deployment Services. There are a lot of guides online, however, none address the whole process of deploying custom images to client machines.

Look for a complete guide and video walk through soon!